How To Cast a Fly Rod For Beginners
If you’ve never held a rod in your hand, either spinning or fly, the best way to approach learning how to cast a fly rod is through kinesiology, or how the body works most efficiently. You can tie yourself in knots trying to make a fly rod work. We examine casting with concepts you already know, removing the knottiness from starting!
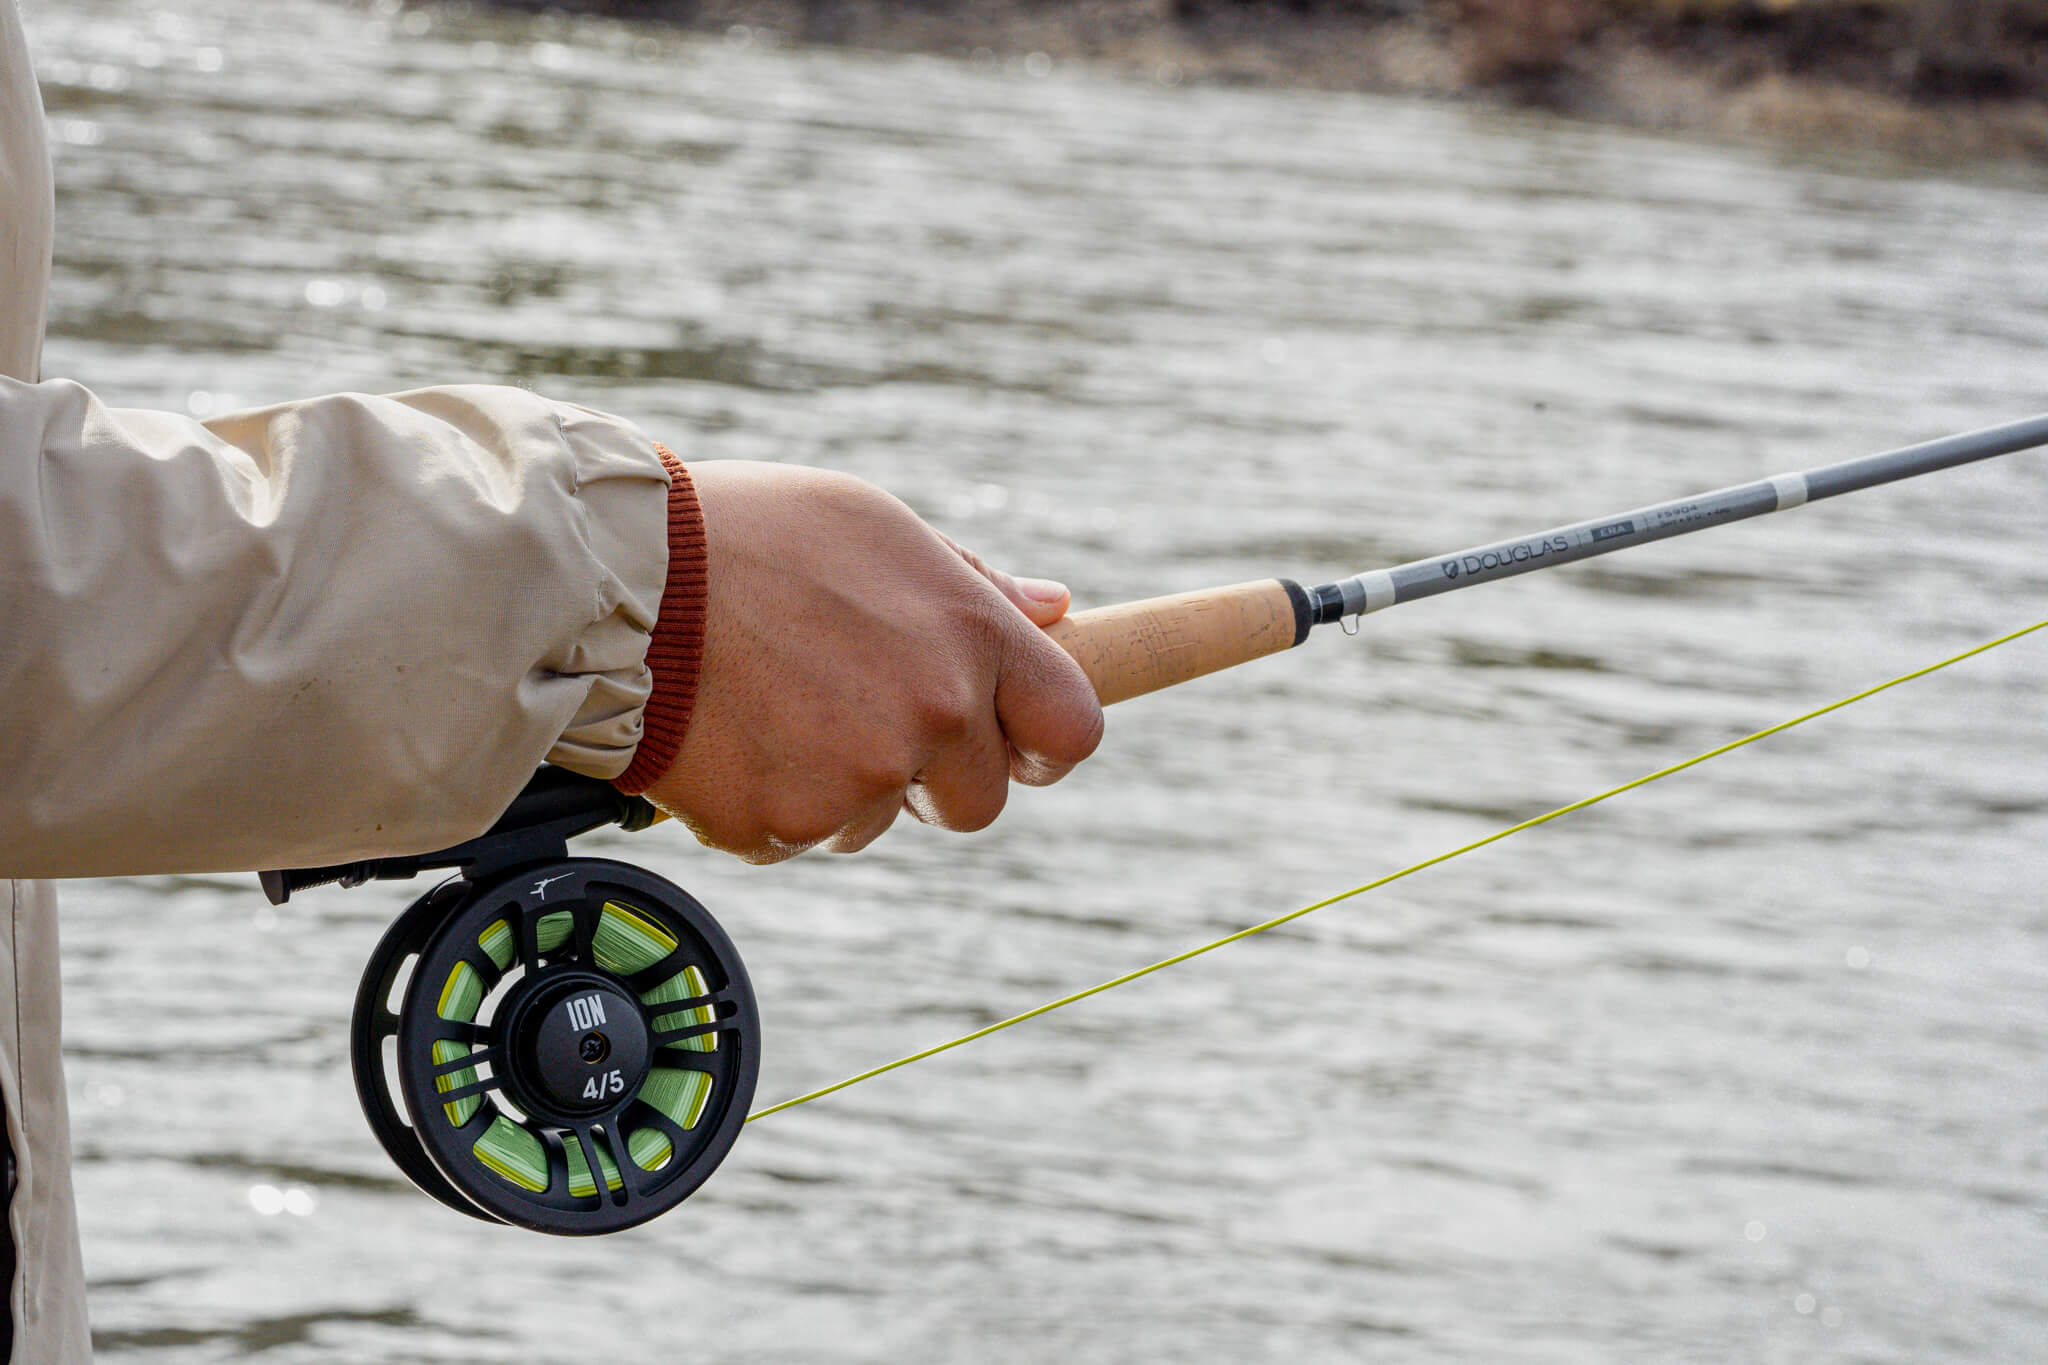
Learning how to cast a fly rod starts with the proper grip. This picture shows the correct way to hold a fly rod- thumb on top, reel below. Grip the rod lightly, you’re not trying to compress the cork. Remember what you paid for the rod? You won’t drop it! A loose grip allows your arm to move freely during the casting motion.

How do you know if you’re gripping too tightly? Your fingernails change color from the pressure. If you wear fingernail polish, you’re going to have to loosen up on your own.
We’re going to discuss fly casting in terms of throwing frisbees and skipping stones. All instructions will be given for right handers- Lefties, you’re just going to have to translate as you have all your lives.
When you throw a frisbee, your right shoulder is facing the target. You take the frisbee back as far across your body as possible. Keeping the frisbee parallel to the ground, you bring your arm across your body- left to right. When your wrist is even with your belly button (center of body), your wrist hinges (not rolls). The hinging ends when your arm is perpendicular (90 degrees) to your right shoulder, and then you follow through.
When skipping a stone, your left shoulder is facing the target. You extend your right arm all the way back, and start forward, keeping the stone parallel to the ground, and your wrist pointing at 2:00 o’clock. When your forearm is perpendicular (90 degrees) to your right shoulder, your wrist hinges (not rolls). The hinge ends at your belly button, and then you follow through.
Here’s where kinesiology comes into play. In both motions, frisbee and stone skipping, the wrist hinges between the belly button and 90 degrees to the right shoulder. That’s the hinge point because it’s where your body is strongest. Simple as that. To understand this concept, try this exercise using the frisbee throw.
Extend your arm all the way across your body, as if you were starting a throw. Now, without moving your arm, hinge your wrist as if you were throwing the frisbee. There is NO power there to throw the frisbee, is there? You would never hinge your wrist there, because it’s a weak position and the frisbee won’t go very far. Now, extend your arm all the way to the right, as if you had just followed through with a frisbee throw. With your arm extended to the right, hinge your wrist. Again, no power, and worse, you can only throw the frisbee behind you to the right, not along the target line created by your shoulders.
It takes focused energy to throw a fly line. From this example, you see where you need to focus. The body’s energy is most efficient when the wrist hinges between your belly button and 90 degrees to your right shoulder. That’s where you’re strongest. It has nothing to do with strength- it’s just the place where you’re most efficient with your strength. Again, this is not a strength issue- it takes very little strength to cast a fly rod. This is about maximizing your energy, utilizing your power where it’s most efficient. It’s about technique.
To put this into practice, look at the diagram.
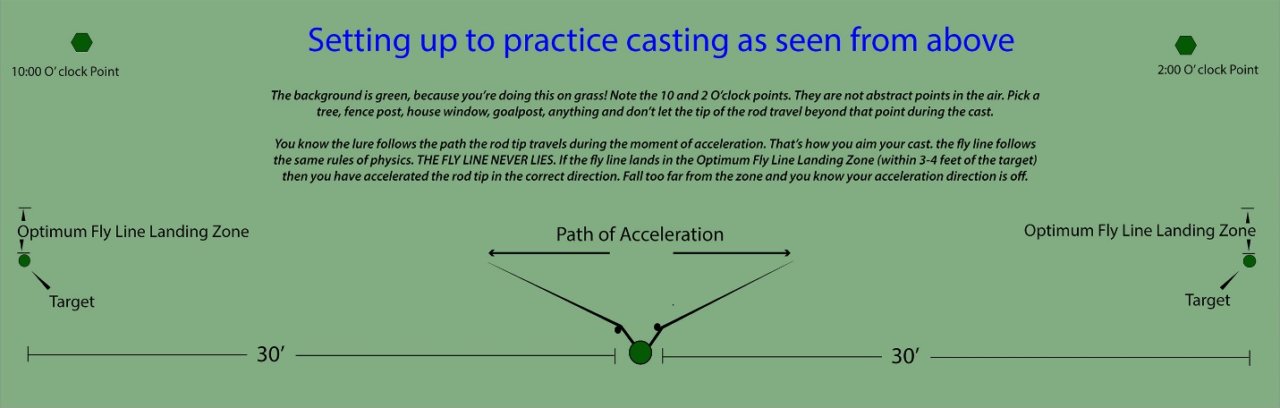
Go to a field, and align yourself as the diagram shows. Find your 10:00 and 2:00 points- as actual objects. Stretch out about 35 feet of fly line to your left, in preparation for the back cast. The following diagrams are close-ups of the angler. The rest of the diagram applies, but is not shown.
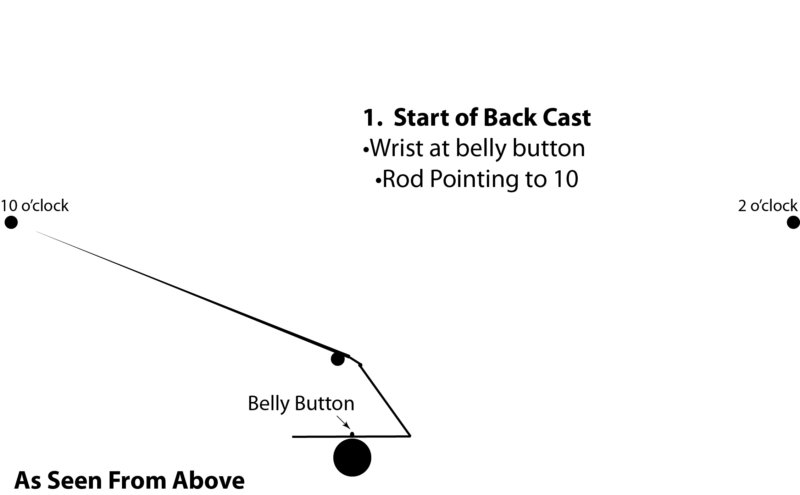
The Start of the Back cast gives a closer look at the body position in relation to the Setting Up to Practice Cast diagram. Drop the rod till it’s almost parallel to the ground. Hold your wrist at your belly button, spin your wrist till you see the first knuckles of your right hand, and point the rod at 10:00 o’clock.
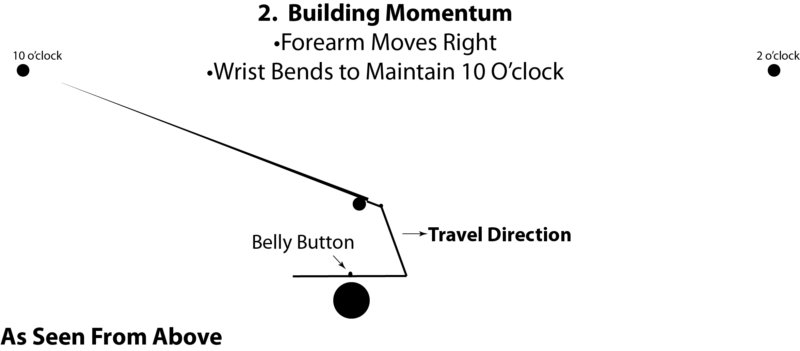
Creating momentum makes casting easier. The arm begins to move to the right, slowly at first, but gathering some pace. As the arm moves to the right, try and keep the rod tip pointed at the 10 o’clock target. THIS WILL REQUIRE YOU TO BEND YOUR WRIST. Notice we said pace, not speed. You’re learning how to do this, not how fast you can do this. Speed comes later.
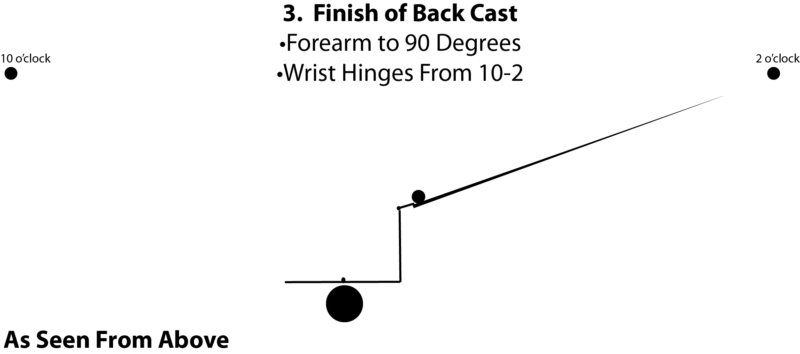
Finish sweeping your forearm to the right, stopping at 90 degrees to your shoulder. During the last 20-15% of the arm movement, the wrist hinges from 10 o’clock to 2 o’clock. This is the critical aspect to making the cast, the wrist hinge. The hinge is like the Three Little Bears- Not too fast, not too slow, but just right. How do you define Just Right? The wrist hinges quickly enough to extend the line completely, but not so fast you can’t feel the rod bend. Slower is better than faster. An indicator the wrist is hinging too quickly- the line tangles on the back cast.
LET THE LINE FALL TO THE GROUND. The line should land parallel to the target line created by your shoulders. For the forward cast, you reverse the procedure. This time, start by pointing the rod tip at the 2:00 o’clock point. Moving to the left, bring your forearm to your belly button, starting slowly and gaining pace. Try and keep the tip of the rod pointed at the 2 o’clock point. At a point 20-15% from your belly button, hinge your wrist from 2 to 10 o’clock, stopping firmly. LET THE LINE FALL TO THE GROUND. You’ll know it’s correct when the line is parallel to the target line created by your shoulders.
You quickly notice when learning to cast a fly rod that any slack in the line creates casting difficulties. Inadvertently lifting the tip creates slack. A less than efficient cast creates slack. Another critical concept. You can’t add energy to the fly line till the tip of the line is moving. Until the tip is moving, any energy added only removes slack. Look for slack, and eliminate it before the cast. You eliminate slack by casting with more energy than needed, or learn how to cast fa fly rod with a friend who pulls the line out straight before casting. Try not to remove slack by shortening the line with the left hand, as soon you won’t have enough line out to load the rod. Maintain at least 35 feet of fly line beyond the rod tip.
Quick note. This is why you’re learning how to cast a fly rod on land! In moving water, slack is always being created by the current. Get ready for it when you hit the water.
Hopefully, with no slack, the first thing you noticed is it took very little energy to throw the fly line. This is about technique, not strength. If you’ve hinged your wrist correctly, the rod has bent during the moment of acceleration (which is your wrist hinging). If you’ve stopped the rod firmly at either 10:00 or 2:00, the rod has unloaded (unbent) in a focused manner and the line has shot out in the direction the tip traveled during the hinge. This is why you allow the line to land on the ground as you’re learning how to cast a fly rod, so you can see if the line follows the path you thought you traveled.
Physics Fact: Centrifugal force is the reason little energy is needed. Simply stated, at a constant rate of rotation, speed increases with distance from the center of rotation. It’s like sticking a dime on a turntable. Put the dime by the spindle, and it stays in place. Put the dime near the edge and it flies off. Same with casting. It might not look like much is happening by your thumb, or that it’s working very hard, but 9 feet away, the rod tip is traveling at tremendous speed. We say flick your wrist, but depending on your definition of flick, it can be too fast/powerful to cast effectively.
THE FLY LINE NEVER LIES. If the line doesn’t land parallel to the target line created by your shoulders, you’ve hinged your wrist incorrectly. If the line is above the parallel point, you hinged too early, If the line is below the parallel point, you hinged too late. Too late or too early IS NOT efficient, as we spoke of earlier. Only when the line is parallel to the target line is the hinge correct, or most efficient.
If you’re having difficulty establishing the proper wrist hinge, stop moving your forearm. You can cast with wrist only, but it’s tiring. Do it a couple of times, and find the hinge. Then add the forearm movement. If the proper hinge disappears, go back to wrist only till it re-establishes.
Think of it this way. The simplest machine has the least moving parts. When only the wrist moves, it’s simple but tiring. When you add the forearm sweep, there’s more room to make errors, but it’s more efficient. Putting the forearm sweep together with the wrist hinge comes in time. When the forearm sweep and wrist hinge are working together, it’s time to extend the arm again to add more energy.
As you practice how to cast a fly rod, moving the wrist from belly button to 90 degrees, we bet your wrist gets sore. It’s to be expected. The wrist hinging is the essence of casting, just as it is the essence of frisbee throwing and stone skipping. You could throw a frisbee or skip a stone only hinging your wrist between belly button and 90, but they’re not going to go very far. That’s because you’re asking the weakest muscles in your arm (wrist) to do the throwing. When really skipping a stone, the arm extends from the body. The arm comes forward at speed, and the wrist hinges from 90 to belly button. THE WRIST MOVEMENT IS EXACTLY THE SAME. You’re using bigger muscles in your arm to create power, but the wrist movement is constant.
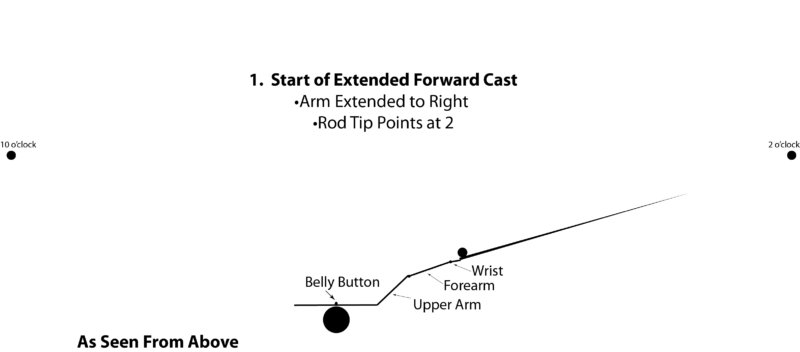
To take pressure off the wrist and forearm on the front cast, point the rod at the 2:00 o’clock point, extending your arm, with your arm at a 30 degree angle to your shoulder.
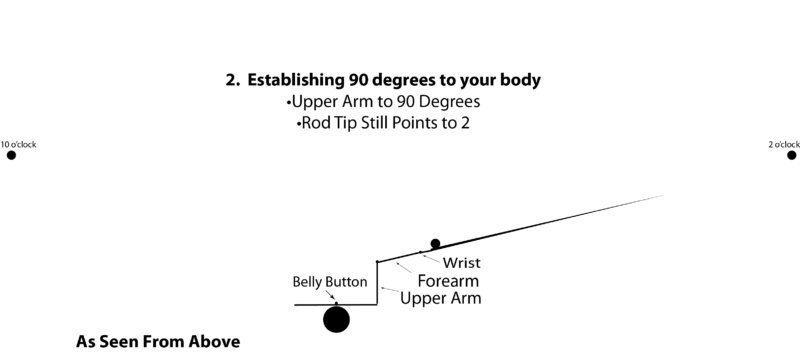
Now come across your body, bringing the upper arm to 90 degrees to your body. As the upper arm comes to 90, the forearm and wrist are adjusting to make sure the rod tip continues to point at the 2:00 o’clock point.
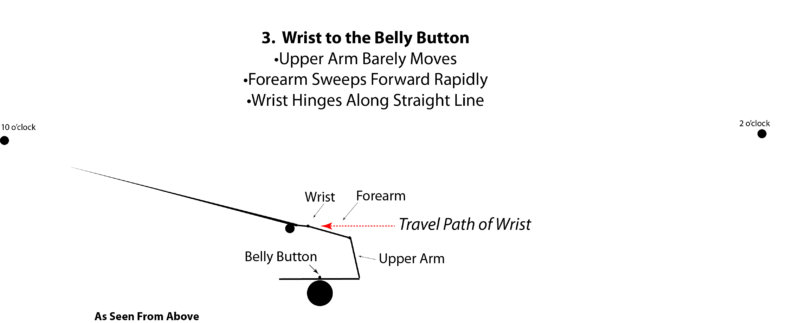
This is the tricky part of extending the cast. The wrist must come forward IN A STRAIGHT LINE. If the wrist arcs, all the power of the cast is lost. If you lose the motion, hold the rod in the left hand and do a stone skipping motion. You’ll see the stone skipping motion is naturally a straight line. That’s what generates the power, a straight line across by the wrist. That’s the focus of this section of the cast.
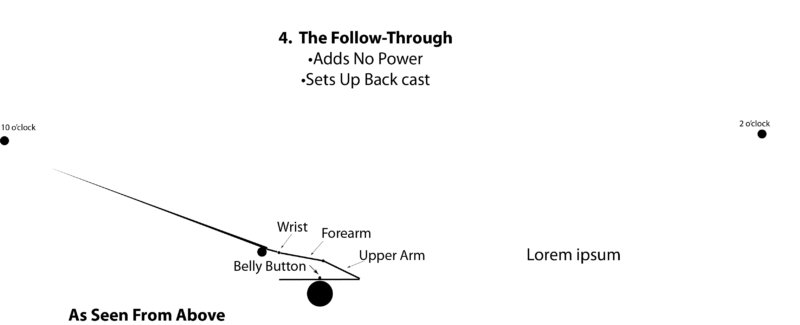
The follow-through sets up the back cast. It adds nothing to the cast, it simply puts your arm into position to start the back cast. When you back engineer these diagrams to create the back cast, this fourth diagram would look exactly like the first diagram. The wrist hinges backwards, and then you point the rod at the 2:00 o’clock point, and extend your arm towards the target.
Be ready to lose the perfect wrist hinge when you start adding length to the arm movement. If/when you lose the wrist hinge by adding arm distance, lose the arm distance. Rediscover the hinge, and then re-add the additional arm moving distance. It takes a minute to add arm movement and maintain the proper hinge, but it can be done. Just remember to reset when you lose the hinge, and then add extra arm movement. The hinge is most important. Don’t lose the hinge to gain arm movement- it has to mesh.
While assessing whether the line lands correctly, along the path you’ve established, you’re also watching to see how long it takes for the back cast to completely extend. When you’ve made a good back cast, you feel the fly line pull against the rod when it reaches full extension. Feeling the line fully extend through the rod is a good thing! That feel is important when switching from practice mode to casting/fishing mode.
Please note. Allowing the line to land on the ground is ONLY used for practice purposes. When you’re fishing, the line is kept in the air on the front and back cast until you decide to make your cast. The line lands on the ground in practice ONLY to assess whether you’re casting correctly. As soon as your line is consistently landing where it should, and you’re seeing/feeling the line extend on the back cast, we move to phase two of the operation.
You’ve been practicing with the rod basically parallel to the ground. You’re probably not going to fish that way. At least not often. This is where things get a bit tricky.
You’re going to change the angle of the rod to the ground. You’re not going to allow the line to land behind you. Two BIG changes. In order to make this happen, you need to understand this concept. The line travels in the direction of the rod tip during the moment of acceleration. You saw this when practicing with the rod parallel to the ground. The line traveled in the same direction as your wrist hinged. This is simply a verbal description of what you already knew!
When keeping the line in the air, the mechanics of wrist hinging is exactly the same- you simply change your arm angle. At some point when fly fishing, you’re going to cast across every angle you can imagine. The practice cast you learned, rod parallel to the ground- you use it to sneak your fly in low under a tree branch. Depending on your spot in the river, you may cast over your off shoulder (left shoulder for right-handed casters) to get the fly to the target. No matter what the angle of the rod, the wrist hinge remains the same.
The back cast must stay airborne on the back cast. Don’t forget this critical concept- you must generate the same amount of energy on the back cast with as you do with the forward cast. Remember how long it took for the back cast to unfurl when you were allowing the line to land on the ground. Remember how it felt when the back cast had fully extended.
This is all critical. Theoretically, the front cast shouldn’t start till the back cast has completely straightened but is still traveling away from the caster. When the front cast starts at that precise moment, the fly line creates maximum load when coming forward. Straight physics says this is the moment of maximum energy- the fly line weight combined with the momentum. It’s a timing thing, and it takes time to get the timing! Go forward too late- the rod unloads and the line falls. This means much of the energy is being used to re-load the rod and re-start the fly line. Go forward too soon- the line becomes a whip. You hear a snap, and if you have a fly on the end, it’s just popped off. The end of the fly line has broken the sound barrier (764 mph) and you’ve lost your fly. It may be difficult when learning how to cast a fly rod but try not to make the whip cracking sound!
Not to be grumpy, but timing is made much more difficult as a novice, since your cast is inconsistent and still trying to learn how to cast a fly rod. Sometimes the line zooms back, other times it’s less efficient and goes slower. It’s tough to build timing when the cast varies. That’s why recognizing the feel of line extension is critical.
Most of us are visual learners. When I was taught how to cast a fly rod, I faced forward, tucked my elbow to my body, did not bend my wrist and moved the rod tip from 10-2. I was to feel the rod load on the back cast before coming forward. However, I had no idea what loading the rod felt like, and I wasn’t facing in a direction that allowed me to see the line fully extended behind me. It was complete guesswork, and my casting progress suffered greatly.
This is why we begin in the position we do. As you cast across your body, you’re able to follow the front and back cast equally, and you can see the line extend. As you watch the line extend, you also feel the line extending against the rod tip. Which makes sense, because when you see the line extend, you’re able to translate that moment into the feel of the rod tip. In the position we began with, make a few strong back casts, watch the line, and feel when it extends. Make a forward cast and let it land on the ground.
Without moving the tip of the rod (to prevent slack), move your feet and body so your node is facing the target, and your shoulders are 90 degrees from their previous position. Using the same power as the previous back casts, make a back cast from the new position. When you feel the line is fully extended, go forward.
Did you learn something? Want to learn more? Click the boxes below for more information on learning how to cast a fly rod for beginners.